Scenery of La Palma

La Palma is geologically young (less than 2 Ma1) and noticeably three-dimendsional island in the Canary archipelago. La Palma is 2426 meters high (Roque de los Muchachos) although the total area of the island is only 706 km2. Numbers like that are hard to visualize. Since most of the readers of this blog are from the US, I will give you the following example: imagine an island which is only one fifth of the size of Long Island but has highest point that is more than six times higher than the highest skyscrapers in New York.

The land area is surely going to change in the future because La Palma is volcanically active. There were several eruptions during the 20th century. Last one so far took place in 1971. Some islands in the Canary archipelago have a desert climate (Lanzarote and Fuerteventura which are located close to the African continent). Islands in the middle (Tenerife, Gran Canaria) are moderately dry and La Palma is the rainiest. No wonder that most inhabitants live in the middle islands and tourists also prefer to go to Tenerife and Gran Canaria.

Tourism infrastructure is weakly developed in La Palma. This island seems to be mostly visited by people who like scenery, mountain trekking, beautiful nature, and perhaps geology as well. La Palma is known as Isla Bonita (beautiful island) and in my opinion it deserves that name.

Here is my selection of some memorable scenes. This is how I remember La Palma.

http://picasaweb.google.com/107509377372007544953/Tenerife#5828535053243715218
Barranco de las Augustias is a deep ravine connecting Caldera de Taburiente with the ocean. River running on the bottom of the barranco is the only perennial river in the Canaries. While I hiked in the caldera I had to cross it on foot because there is no bridge, just a flooded road. It was not too dangerous, though. Water was about 40 cm deep. Here I am standing on a rock in the river. I was first looking for a place to cross the river with dry feet. I even found one place where I only needed to jump little more than two meters but it seemed too dangerous to attempt such a foolish jump on slippery rocks. So I just did it like in good old times during my military service when we just crossed rivers straight without hesitation and time wasting. It takes about 7-10 km of walking until boots are dry again. Unfortunately, I had to cross the same damn river again when I came back.

Coastline of La Palma is usually rocky and lots of it is inaccessible because of high cliffs. Here is the best swimming beach (Puerto Naos) on the island. Sand on La Palma is universally black.

http://picasaweb.google.com/107509377372007544953/Tenerife#5821093330984695138
Artificial salt pans near the southern tip of La Palma. This beautiful coloration is due to extremophile microorganisms (alga Dunaliella salina) that can tolerate very high salinity. They are photosynthesizing organisms that produce bright-colored pigment carotenoid that also gives bright coloration to shrimps who feed on algae and also to many birds who feed on shrimps.
http://picasaweb.google.com/107509377372007544953/Tenerife#5828535040398242962
Lots of lower areas near the coast are occupied by huge banana plantations.
http://picasaweb.google.com/107509377372007544953/Tenerife#5825488435304091602
Bananas grown in the Canaries seem to be smaller than those I am more familiar with in grocery stores.
http://picasaweb.google.com/107509377372007544953/Tenerife#5825488459919406914
Canaries have their very own native date palms (Phoenix canariensis) but their small fruits are not worth eating.
http://picasaweb.google.com/107509377372007544953/Tenerife#5820695530161357554
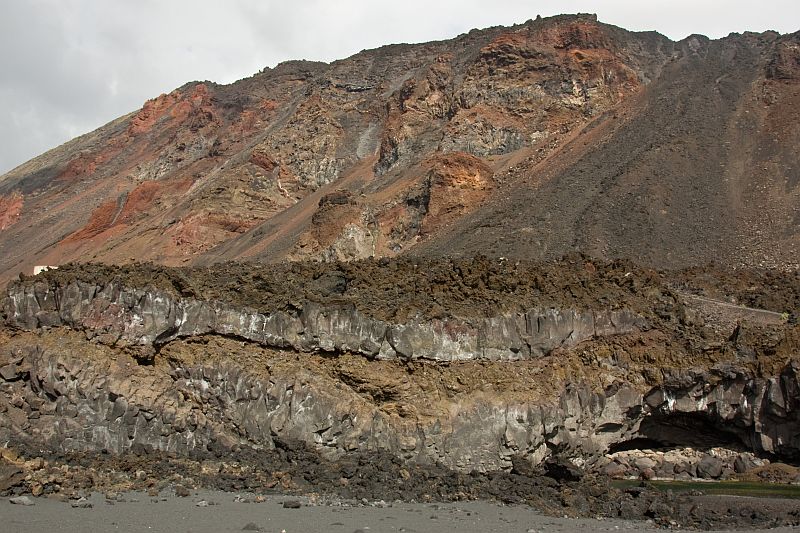
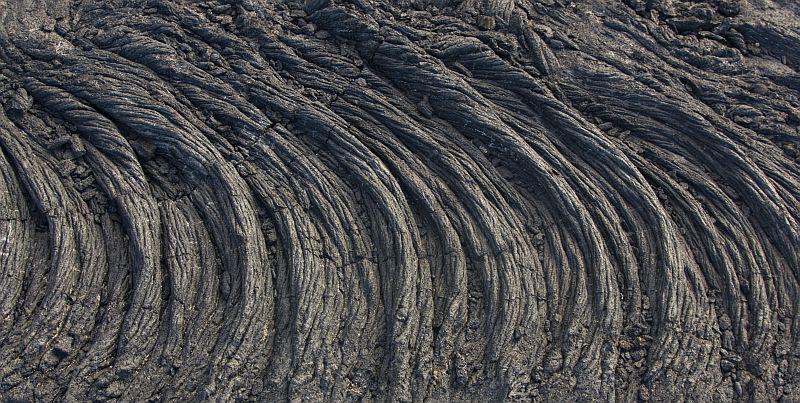
There are many fresh-looking lava flows on La Palma. Here is an edge of aa lava flow. Lava flows on La Palma are almost universally of this type although most of them are composed of smaller clinkery chunks of solidified lava.
http://picasaweb.google.com/107509377372007544953/Tenerife#5828535060480550882
Higher parts of the island were surrounded by clouds.

Cross-section of a lava flow. Aa lava has crumbly upper and massive lower part. There are two flows on the picture.

http://picasaweb.google.com/107509377372007544953/Tenerife#5828535092178017602
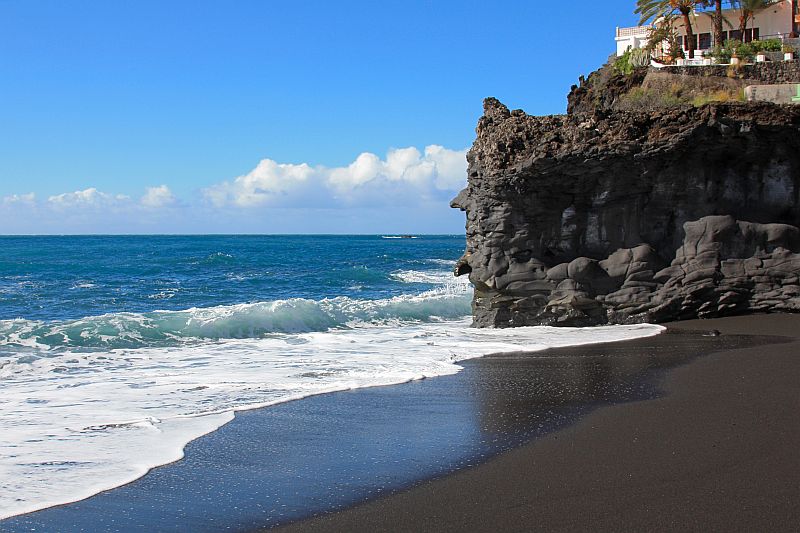
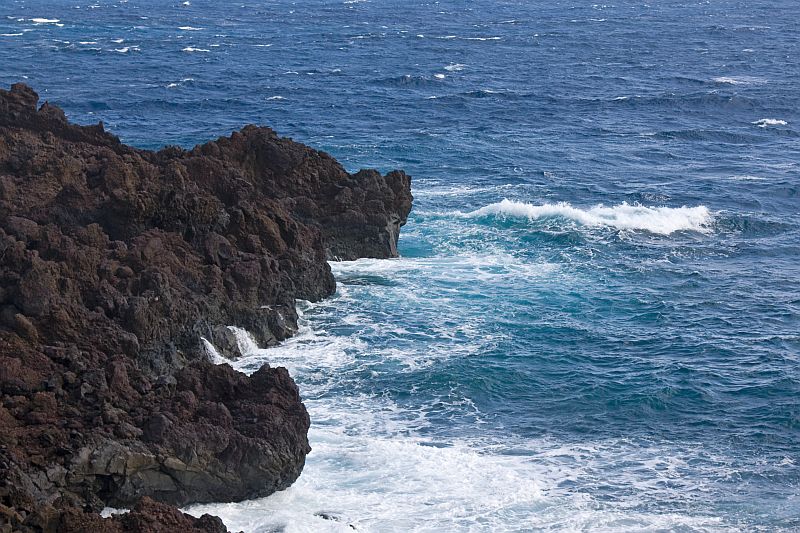
Waves on the western coast. It is a fine place for swimming but getting in may be somewhat difficult.
http://picasaweb.google.com/107509377372007544953/Tenerife#5828535098491876466
I saw a fair number of rainbows there. They occur often because La Palma has lots of sunshine and frequent light rain showers in winter. This particular rainbow was very intense and it formed a complete bow. For me it is unusual to see a rainbow in front of mountains. Usually it seems to be behind physical objects.

Olivine augite basanite
Basaltic rock (most likely basanite) from Caldera de Taburiente, La Palma. Black is pyroxene augite, orange is olivine or more precisely what is left of it. Orange patches are former olivine crystals that are now composed of a mixture of silicates and iron oxides which is known as iddingsite. Olivine is a common mineral in many basaltic rocks. Width of view 9 cm.

http://picasaweb.google.com/107509377372007544953/Tenerife#5828535106306021378
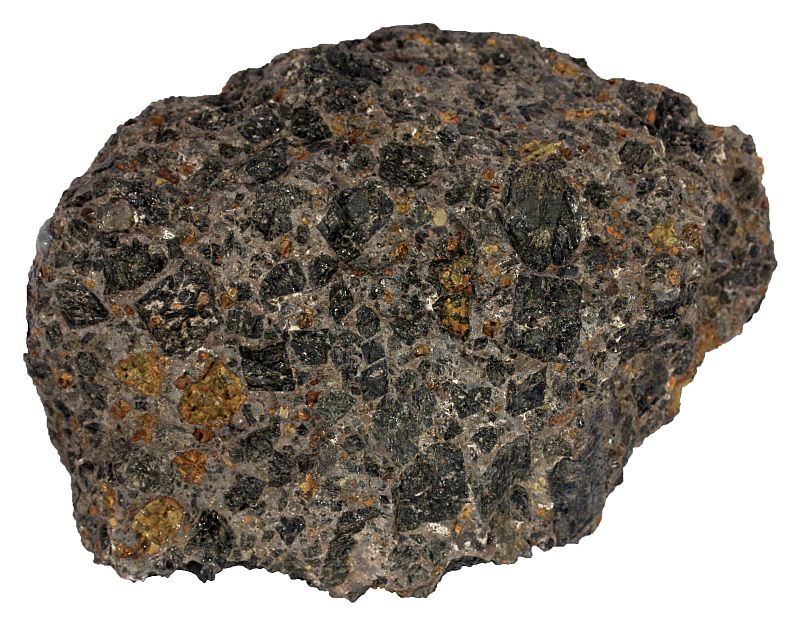
Volcanism on La Palma is alkaline in character. It means that magma is often enriched in potassium and sodium. As a result of this, rocks like phonolite occur on La Palma. Phonolite is not flowing as easily as basaltic lava does. It tends to form lava domes instead. Here is a green phonolitic lava dome formed in 1585.

Aa lava near the southern tip of La Palma. This lava flow formed in 1971.

http://picasaweb.google.com/107509377372007544953/Tenerife#5828535130713207474
Fault scarp that most likely formed in 1585. Had this fault movement resulted in a collapse of a part of the volcano, violent pyroclastic flows could have been triggered.

Most lava flows on La Palma are crumbly aa lavas but not always. Here is a beautiful example of smooth pahoehoe.

http://picasaweb.google.com/107509377372007544953/Tenerife#5828535137123523874
Volcanoes on La Palma produce lots of pyroclasts which are almost always lapilli in size (2…64 mm). Here is a field of lapilli more than a kilometer above sea level.
http://picasaweb.google.com/107509377372007544953/Tenerife#5828535141295371602
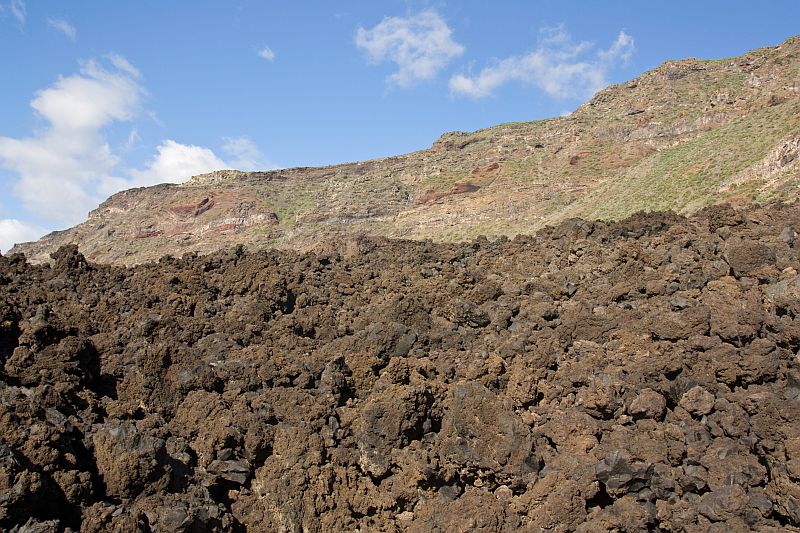
Older flanks are deeply dissected by ravines which are locally known as barrancos. Here is a relatively small barranco on the northwestern part of the island. Southern part of the island is geologically so young that no deep barrancos have had time to cut themselves deeply into the rocks. Northern part of the island is green and wet because of trade winds that blow from northeast.
http://picasaweb.google.com/107509377372007544953/Tenerife#5825488397852218418
Poinsettia is a pretty common plant on La Palma.

Fresh aa lava flow in the foreground. Behind that is a phonolitic Bejenado volcano (green mountain) and between Bejenado and the aa lava flow is Valle de Aridane (one of the most populous regions of La Palma). This is a valley that formed when the southern part of the Taburiente volcano collapsed into the sea (the rim of the Taburiente is visible behind Bejenado). Bejenado volcano formed after the collapse of Taburiente. Between Bejenado and Taburiente volcanoes is Caldera de Taburiente after which all calderas got their name.

http://picasaweb.google.com/107509377372007544953/Tenerife#5825488394290055154
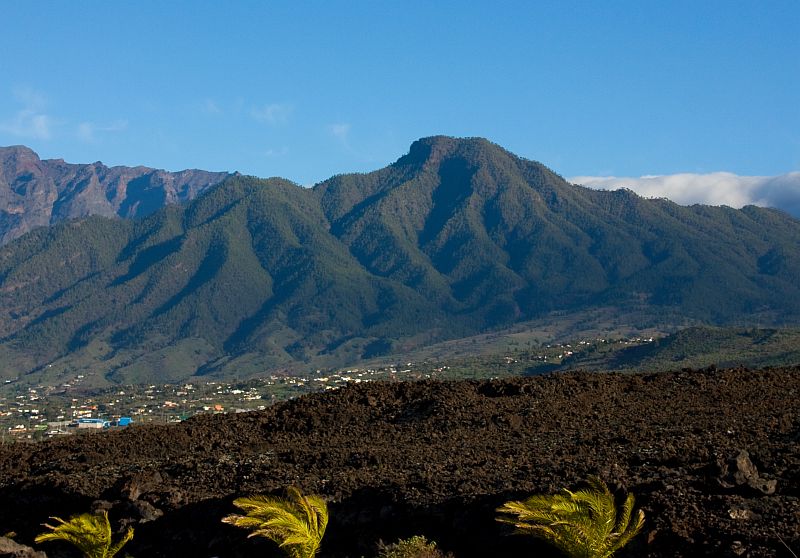
Bejenado volcano looks green because it is covered with pine forest. These are native pines of the Canaries (Pinus canariensis).
http://picasaweb.google.com/107509377372007544953/Tenerife#5828535171367209522
An outcrop of pillow lava. These rocks formed when La Palma was only a seamount. They crop out because of Caldera de Taburiente — two kilometer deep erosional scar in the middle of the island and they are uplifted as well.

Aa lava flows occur in many parts of the island.
Basalt pebbles
Basaltic rocks on the southern coast.

http://picasaweb.google.com/107509377372007544953/Tenerife#5828535169282149010
Lapilli tuff near the eastern coast. Lapilli tuff is a lithified mixture of fine-grained volcanic ash and coarse lapilli.

References

1. Hoernle, Kaj & Carracedo, Juan-Carlos (2009). Canary Islands, Geology. In: Encyclopedia of Islands (Encyclopedias of the Natural World) (Ed. Gillespie, Rosemary G. & Clague, David A.). University of California Press. 133-143.

Geology and The Hobbit

I went to the movies yesterday to see The Hobbit. Overall I think that this movie was too long and many scenes were unrealistic. Perhaps I should not complain about it because I knew that I am going to see a fairy tale but fairy tales too should not be that silly and unbelievable. I have not read the book, so I do not think that I am the right person to criticize this movie but I made some geological observations which I would like to share with you.

I liked the scene with Gollum and Bilbo. It was well done and some riddles were geological.

Gollum’s riddle:

What has roots as nobody sees
Is taller than trees,
Up, up it goes,
And yet never grows?

Bilbo knew after some thinking that the answer is “mountains”. However, it is evident to a geologist that Gollum made a mistake. Mountains DO grow.

Even better one was another riddle given by Gollum again:

This thing all things devours:
Birds, beasts, trees, flowers;
Gnaws iron, bites steel;
Grinds hard stones to meal;
Slays king, ruins town,
And beats high mountain down.

When I heard it I thought that this is a nice description of weathering. I was very interested to hear what Bilbo is going to say about it. He muttered “time” and it was the correct answer which surprised me positively. It is the next best thing to say and is also very geological because time is something that is in no short supply in geology and big geological things (like wearing down mountains) require very long time in human’s timescale.

Many other scenes in this movie were beautifully geological as well. Most of the rocks I spotted were sedimentary. In majority of cases they seemed to be carbonate rocks. New Zealand where this movie was filmed is definitely a wonderful country for hiking. It has been in my list of places to go some day for a long time and now I’d like to go there even more.

Biological interlude from the Canaries

Here are some pictures taken during my recent trip to the Canaries. This time it is not about rocks.

http://picasaweb.google.com/107509377372007544953/Tenerife#5825488397852218418
Poinsettia seems to be a common plant in the Canaries although it is not a native species there. It is often used in floral displays during Christmas and in my native language its name means ‘Christmas star’. Bright red leaves are indeed leaves, not flower petals.
http://picasaweb.google.com/107509377372007544953/Tenerife#5825488393362708738
Geese are often eaten during Christmas. I hope that she is still doing well. I don’t know whether she is really she (there is no difference in plumage color between male and female geese) but I remember from my childhood some confrontations with male geese. They are often quite aggressive birds. This one was much calmer.
http://picasaweb.google.com/107509377372007544953/Tenerife#5825488394290055154
These pine trees are very abundant in the Canaries and they are indeed native plants there. These pines are known as Canary Island pines (Pinus canariensis).
http://picasaweb.google.com/107509377372007544953/Tenerife#5825488435304091602
Banana plants are very common especially on La Palma. Large part of the island is covered with banana plantations.
http://picasaweb.google.com/107509377372007544953/Tenerife#5825488494169723778
This tree is also very common there and it is native as well. It is Canary Island date palm (Phoenix canariensis). It is a relative of better known date palm (Phoenix dactylifera) which is grown for its sweet fruits.
http://picasaweb.google.com/107509377372007544953/Tenerife#5825488459919406914
Canary Island date palm also has edible fruits but they are smaller and edible part is thinner. This tree is a natural symbol of the Canaries together with the Canary bird.
http://picasaweb.google.com/107509377372007544953/Tenerife#5825488459853290626
Cacti are from Americas just like poinsettia but they seem to feel good in the Canaries and some species are very widespread. This picture is taken in a cactus park.
http://picasaweb.google.com/107509377372007544953/Tenerife#5825488486045533874
There were not only cacti in the park. I also saw trees with very peculiar trunks that look like bottles. This plant (Moringa hildebrandtii) is a native of Madagascar but unfortunately it is not growing there in the wild anymore. Local people there do not understand that the unique nature of Madagascar is their greatest treasure. They prefer to burn their rainforests to make room for crop fields. It is stupidity in its most genuine form but this is topic for another day and post.
http://picasaweb.google.com/107509377372007544953/Tenerife#5825488500290104754
I could swear I saw a road sign that invited me to a cactus and camel park. However, I saw there only one animal and it is definitely no camel. But I would also hesitate to call it a horse.
http://picasaweb.google.com/107509377372007544953/Tenerife#5825488510649577218
Is she donkey? Well, I don’t know. I am no expert in this but for me donkey has longer ears and this one really is too horse-like. So I thought that perhaps she is a mule.

Going to the Canaries

It has been a while since I last saw something geologically interesting in the field. It is time to do something about it. So I will go to the Canary Islands at the end of the week. The Canaries are not only very interesting geological destination but they also offer much better climate than my home country does at the moment. So it really is time to escape for some time. My trip will last a little more than two weeks.

I have been in Tenerife before. It was few years ago. This time I will not go there. I will visit two other islands: La Palma and Gran Canaria (Las Palmas). They are both volcanic islands on the oceanic crust. Hence, they are hot spots like Hawaii and many other similar archipelagos. Gran Canaria is older and not as active anymore (although not extinct) but La Palma is probably located on top of the current position of the Canaries hot spot (with recently active El Hierro island). So I hope to see lots of relatively fresh volcanic structures and rocks there.

La Palma is visited by a small number of tourists when compared with Tenerife and Gran Canaria but it is definitely worth a visit if you are interested in geology or just mountain trekking. La Palma is known as Isla Bonita (beautiful island) and this time I have a firm plan to record as much of this beauty as possible onto my camera’s memory card. Regrettably I have only few pictures from Tenerife and their quality is not good. This time I have better equipment (new camera lens which I am eager to test) and probably I am also better prepared for it as a geologist. I really would like to share all of it with you. However, I am sure that I will have internet access only occasionally. It will be a low-budget trip with nights spent somewhere outside. But I will try to at least sometimes post a picture or two with brief explanations.

I do not want to reveal my future plans before they are certain but it seems to me that the next year or at least the first half of it may become quite volcanic for me. So the course of Sandatlas may also shift considerably towards topics related to volcanism.

http://picasaweb.google.com/107509377372007544953/Tenerife#5812523623974836946
Red circles are around La Palma (on the left) and Gran Canaria (in the middle). Tenerife is the big island between them. I hope to see its familiar snow-covered Teide volcano when flying from one island to another. Photo: NASA.

You are of course more than welcome to recommend specific places that are worth visiting on these islands.

How to quickly enhance your pictures

In the previous post I described how to isolate an image on white. This time I will mention some easy yet powerful Photoshop techniques which have helped me to get more out of my photos. I am not going into details because there is an enormous amount of information already available on the internet about all kinds of Photoshop tricks and this is not my speciality. I am just using some basic Photoshop techniques which have helped me but I definitely do not consider myself an expert in this field. You are welcome to recommend additional tricks which might help me and others.

Levels

The Levels tool (Ctrl+L) has been very valuable for me. I apply it to most of my photos. It shows you the histogram (distribution of brightness) of the picture and allows to make some adjustments. If the histogram does not extend from one end to another, you could consider moving the triangular sliders below closer to the edge of the histogram. By doing that you will define new black and white points and stretch the histogram. Moving black point has the strongest and most desired effect in my opinion because it will make foggy images much clearer. Do not overdo it because defining new black and white points means that you will clip some dark and bright tones. You can also use midtone slider (gray triangle in the middle) to compress either dark or bright midtones but I do not find it as valuable as black and white point sliders.

White balance

In the previous post I mentioned that I prefer to use a sheet of white paper to have a white reference surface. There are many other ways to set the correct white balance. I use gray card when indoors and outdoors I just select the appropriate predefined white balance settings from the menu and sometimes take control shots of a gray card if the conditions are somewhat more tricky (clouds or shade). Camera usually does adequate job outside. These are indoor conditions with artificial lighting that usually cause problems. If you are not sure what you are doing, simply select auto white balance (AWB) and you should be fine while outdoors. But what about the white sheet of paper? How to use it to set the white balance? Photoshop offers a very convenient tool for it which is named Curves. Press Ctrl+M to access it and choose a pipette below (righternmost of the three) which is used to take a sample from image that should be white. So just click with it on a surface that should be white (your piece of paper) and all the colors in the image will be modified accordingly. This tool usually performs quite well but pay attention to the area you click on because white paper is not absolutely white. Choose the brightest area and try again in another place if the result is not what you expected.

Vivid colors

Photos with vivid colors always draw more attention than the ones with drab colors. Photoshop has a Saturation tool but I do not like it because it also boosts luminance, not only colors. You can give a very little boost to colors without making them unnatural. There is another and much better way to add colors to your images. To do that convert your image to Lab mode (Image -> Mode -> Lab Color). Now pay attention to Channels window (next to Layers). There are three channels: Lightness, a, b. We ignore lightness and work on with a and b. Select a and press Ctrl+L to open Levels tool. Now we can see the histogram we are already familiar with. To boost color you should move both black and white triangle inward by an equal amount. I prefer to write the values instead of 0 and 255 that are already there (10 and 245 for example). It must be equal amount from both sides, otherwise you not only boost but also modify the colors which we do not want. 10…25 from both sides is sufficient to get a noticeable effect. Repeat the same with b. Now check the result and compare it with the original. If you are not satisfied, go back and do it again with other values. Note that this modification suits well with some photos but definitely not with all of them. I apply it when my samples are colorful (bright green, red, and blue tones) but avoid it when just dark and light tones dominate because in the latter case this technique tends to amplify tones that really are not there in the first place to any noticeable extent. It only makes your almost black and white rocks or whatever you are photographing yellowish. Do not forget to go back to the RGB mode (Image -> Mode -> RGB Color) after you are done with this.

Shadows and highlights

Sometimes there is too much contrast in our photos. Dark shades and washed out reflective areas. Such photos are often beyond repair but if they need just a slight modification then you could try Image -> Adjustments -> Shadow/Highlights. It helps to brighten up shady areas and darken washed out areas. It is quite amazing tool but can be used only very modestly because shady areas become quickly very noisy and photos obtain somewhat unnatural look. “Noisy” means that there are lots of colorful pixels that really should not be there because they do not represent the real colors of the object we are photographing. Be careful with this tool and only use it when really needed. The same is true with what ever we do in Photoshop. It pays to be modest.

Smooth outline

I described in the previous post how I isolate an object on an image on white. It is often needed to pay attention to the outline after doing it because it may be too sharp and becomes disturbingly noticeable. To make it look better, zoom in and choose Blur tool (R) with a small brush size (10-15 pixels) and wipe over the sharpest parts of the outline. After you have done that there is much smaller chance that someone will complain about unnatural outlines of your cut-out objects. Here it is also very important to have a white background if you intend to isolate your image on white. If it is not then you are bound to waste lots of time trying to make the outline look natural.

I have one more recommendation. If you are using SLR then you can set your camera to record both JPG and RAW formats. Do it because RAW gives you much more flexibility later. You can easily modify white balance, correct exposure, etc. If you have only JPG then you are very restricted in your options. Every time you enhance your photo in one area, you have to give in in another. The only drawback of RAW is its file size but nowadays it is not a real problem anymore.

If you are still reading then perhaps you are also interested in my macro photo tutorial: How to take good macro photos.

How to isolate an image on white

Several people have said that my photos look great and they would like to learn the technique. So I decided to write a series of posts which will reveal my “secrets”. I have already written a post named How to take good macro photos which I recommend to read also because it covers some of the basic requirements of macro photography which are important to master because you need to shoot right to get a good result.

I often isolate photographed objects (mostly rock samples) on white. I do it because it looks nice and professional if people see only the things I want to show them. There are really many ways to accomplish that and I am not saying that my method is the best but it works for me. The most professional way to do it is to arrange a special studio with powerful scattered lighting and white backgrounds all around the photographed object. If you do it this way, you could take photos isolated on white with your camera and need almost no photoshopping later. However, this is not my approach because I often find myself in very uncomfortable conditions. Sometimes in the field, sometimes in a dimly lighted museum warehouse with very little room, etc.

If I want to isolate photos on white later, then I take care to organize white background behind the object in the first place. Easiest way to do it is to place a white sheet of paper (A4 format is large enough in most cases) behind the object. It serves two very important purposes. I want to cut out the object later and if the background is already white, I can do it relatively easily in Photoshop without leaving ugly colored rims to the object. If my background is gray for example, then I have lots of trouble later because I need to manually go over the entire outline of the isolated object to isolate it properly which wastes lots of time. I am not even talking about red or blue backgrounds which is a nightmare.

Another reason for using white background is to get the correct white balance. It is difficult to judge whether your photos have right colors without a reference surface. White background is good for that because I know that it has to be white on my photos and if it is bluish or reddish instead, then I can do something about it. This is also very easy to correct in Photoshop. The issue of white balance is of great importance in photography and definitely deserves an entire post dedicated to it (maybe I will write about it some other day). The method I described above may not be the best or most professional but you can be sure that if you have something in your photo that you are sure has to be white, then you are in a good position to get the colors correct.

Now we have a photo of a rock sample and a white piece of paper behind it. Now what? First of all, I hope you read the other article I mentioned before. There I listed several key points like the necessity to use tripod and additional light sources if you take the photos indoors. Underexposed photos with no focus are not worth our time. Isolating on white will not make them any better. It is necessary to stress these points because these are the most common mistakes beginners do: they do not have enough light and their camera shakes while they are photographing.

I will leave most of the tricks for my next article: How to quickly enhance your pictures. Here I just cover the method I use to remove the background. In reality this is one of the last things I do after correcting white balance and other important steps. I will open the photo in Photoshop and select the Magic Wand Tool (hotkey: W). I use it to wipe over the background to outline the sample. Photoshop understands it easily if there is enough contrast between the background and the object. However, it almost never makes a perfect job. You have to zoom in and go over the entire outline of the object and make necessary adjustments where needed. To do that press Alt (these guidelines are for Windows users, Mac commands are similar but different keys are used) and wipe over the object to enlarge the selection or Shift to subtract from it. Note that we are really selecting or outlining the object now, not the background.

But in many cases Photoshop can not properly understand you and you have to take a full control of the process. To do that select Lasso Tool (L) and just draw a line around the object as closely as possible. You have to zoom in to do it. Here again you should press and hold down the Alt key if you wish to add and Shift key if you wish to subtract. It may seem complicated at first but experiment a little and quite soon you feel comfortable doing it. After you have correctly outlined the object, you need to inverse the selection because we want to remove the background, not the object we are working on. To do that, choose Select -> Inverse. Now we have the background selected. To remove it, just click Edit -> Fill and choose white color and take care that the opacity is set to 100% and press OK. It means that we do not actually remove the background. We just paint it white but this is exactly what we need at the moment. You can also choose black background. Sometimes it works well with light-colored objects.

It was as simple as that. There are other methods to do the same but for me it seems to be the easiest one. In the next article I will show you some easy tricks which will make your photos clearer and reveal their real beautiful colors.

A little fun with diagrams

There are two diagrams which are widely used to classify most igneous (lava) rocks. I have written about both of them before: QAPF diagram (for plutonic) and TAS diagram (for volcanic rocks).

Rock types like granite, gabbro, diorite, syenite, granodiorite, etc. can be defined with the QAPF diagram (shown below). These rocks have volcanic equivalents: rhyolite, basalt, andesite, trachyte, and dacite, respectively. It must be mentioned that the QAPF diagram exists for them too (same diagram with “granite” replaced by “rhyolite” and so on) but it is used not nearly as widely.

http://picasaweb.google.com/107509377372007544953/Chert#5808891582074096306
QAPF diagram for plutonic rocks.

TAS diagram
TAS diagram for volcanic rocks.

We use the TAS diagram instead for volcanic rocks. I am not going into details why we use it instead of QAPF but what is really important to understand now is the fact that these two diagrams are completely different. QAPF uses minerals in the studied rocks while TAS is based on the chemical composition. And here comes the obvious and unavoidable problem. How do we make sure that rhyolite according to the QAPF diagram is indeed still rhyolite according to the TAS diagram and not dacite, trachyte or something else.

I am sure the creators of these diagrams have put considerable effort into solving this problem but they surely could not have avoided the inevitable outcome that one particular rock sample may be rhyolite according to one and dacite according to another classification diagram.

So I thought that it could be fun and even somewhat educational to try to put these two diagrams together. I can not say that they match perfectly, far from that. But I am still quite positively surprised that it is possible to do. I was sceptical about that before I started.

Here is the result. QAPF double triangle below (red) and TAS (blue) placed on top of it so that basalt is together with gabbro, rhyolite is with granite, and syenite is with trachyte. I had to squeeze the TAS diagram a bit for that and I had to rotate it about 125 degrees counter-clockwise to get the result.

It was educational for me and I’d even say that there is a certain amount of beauty how these so much different diagrams actually do match each other if you just tinker a bit.

http://picasaweb.google.com/107509377372007544953/Chert#5808909142590630306
QAPF (red) + TAS (blue). Plutonic rock types are red and volcanic rock types blue. Volcanic equivalents of each plutonic rock are below them and each label is more or less in the correct place on both diagrams.

Are we really moving backwards?

I have been immersed in an earthquake-related stuff the whole day. I am busy writing geological chapters to geography textbook for Estonian highschool students. Today I worked and am still working on a chapter about earthquakes. And then I heard the news from Italy. I do not need to repeat here again how ridiculous it is that scientists are blamed for being unable to predict earthquakes. You can learn more about the impossibility to predict earthquakes and the geological situation in Italy from an expert in this field: If you’re waiting for an earthquake warning, you’re doing it wrong.

I know that they were sentenced guilty for making “falsely reassuring statement” but this is really the same thing. In hindsight we can say that they were perhaps too self-confident but what exactly do the public want us (the scientific community) to tell them? Do they want to hear that you should sleep in a tent whenever there are slight tremors? They would not do it anyway. Perhaps they want us to learn to mumble with great incoherence like Alan Greenspan famously said about his own style which he had to master?

Another thing I really do not understand is that they were sent to prison for six years. What is the purpose of this? Are they really so dangerous to society that they should be isolated for a long time? The only thing that seems logical to me is that this decision is a revenge driven by blind anger. You want someone else to be guilty when things go awfully wrong, don’t you? Or perhaps there are something far more deeper going on?

The most alarming thing for me is that now officially we have a court decision which in a major way sends us backwards towards dark medieval ages. I wonder what Carl Sagan would have said about this. He wrote an entire book devoted to similar topics: The Demon-Haunted World: Science as a Candle in the Dark. I recommend to read it. It is really written very well and explains the whole thing far better than I could ever do. This world is full of people who would love to destroy what we have achieved. They hate freedom and because of that they can not stand science. I am fully aware that they are all around us just waiting for the chance but so far I sensed that overall we are stronger. Now I feel a lot less secure. It is ironic in a strange way that the freedom and enlightenment we enjoy now got its start from Italy — Giordano Bruno, Galileo Galilei, Leonardo da Vinci and so on. I really hope that this is not the beginning of an end that also starts from Italy.

Sandatlas has a birthday

It was October 17, 2011 when I started active blogging on Sandatlas. During the past 12 months I have written 223 posts. I had one crazy month when I wrote a post every single day. It was March which I ended with 31 posts. July, on the other hand, was very weak — only 5 posts. It is hard to predict which posts will become more popular but in hindsight it seems that people value more the posts which took more energy from me. This world is really tough — one needs to work hard to get attention. Nothing comes easily. If it takes 10 minutes to write a post, then perhaps some of my regular readers take a quick look after it is published but one month later no one seems to care anymore. I need to work hours and days on an article to make it worth something in the long run.

I learned that during the past summer when my motivation to go on with Sandatlas was pretty low. The reason behind that was the number of readers which was not growing. It was much worse, these numbers were steadily declining month after month since March. Then I wanted to know which articles are more popular and tried to figure out why. I discovered that longer articles are better. It was somewhat surprising because I thought that my readers are not willing to read long posts. I was proved wrong. Well, I can not say for sure what my regular readers prefer but at least Google seems to value lengthy posts more.

I also discovered that the most popular articles are the ones which took long time to write. Another thing I noticed was that people seem to value overview articles. They want someone to make a meaningful introduction into broader subjects. By far the most popular post I have written is Sand types. It was puzzling for me for some time because this page is just a collection of links. And some of the articles behind these links are actually very short and somewhat meaningless. I really should improve them, hopefully some day I will. But the lesson was learned again. I decided to focus on rock types. This page is not nearly as popular yet but hopefully it should have more potential in the long run. Posts about individual rock types are quite popular also. Maybe not initially but the good thing with them is that they have lots of staying power. Once they are written, most of them attract visitors every day.

I make no attempt to write daily anymore because I have neither time nor energy to write good content every day. Encyclopedia-like posts may be boring for some of my readers but they definitely offer more value in the long run. So the most important take-away lessons for me is to put lots of energy into writing and to focus on overview posts. The results so far are encouraging.

I wanted to take a look back and highlight some articles written in the past year that gathered more attention. Here are 12 articles and some facts extracted from them. These posts are in no particular order and they are not necessarily the top 12 but all of them have gathered some attention. For some reason my readers think that these posts are better than my average.

1. Anorthosite is a very common rock type on the Moon. However, lunar anorthosite has no iridescence which has made terrestrial anorthosite famous ornamental stone. Here is an explanation what makes these rocks different from one another: Lunar anorthosite.

2. Beach sand in arctic regions is often immature. Find out why: Sand that remembers the rock it once was.

3. Highest volcanoes tend to be in South America. I found seven reasons that might explain why this is the case: Highest volcanoes are in South America. Why?

4. Diamond is hard to spot in sand but did you know that it has several accompanying minerals that will often give it away: Heavy minerals.

5. Columnar basalt is well-known but did you know that even sandstone may be columnar: Sandstone columns in the middle of a crater.

6. Want to take macro photos? Here are some guidelines to get you started: How to take good macro photos.

7. Olivine is known to decay very rapidly in the weathering environment. However, it is still pretty common constituent of volcanic sand and even forms majority in some sand samples and not only in Hawaii: Is Papakolea the only green beach.

8. How much gold have we already extracted from the crust? Here are some calculations: Gold in numbers.

9. Sandatlas is also a travel blog. There is a funny thing with travel posts. They are fairly popular initially but disappear into oblivion soon after being published. My report of a trip to the Giant’s Causeway is one of the most popular of these posts: Giant’s Causeway.

10. I have started an ambitious project to write an illustrated overview of every major rock type. One post of this series was described the following way: “Rock p**n… and every image is worthy of a centerfold”. Thanks, Ron, this is one of the best compliments I have ever received 🙂 Here is the article: Pegmatite.

11. Yet another rock post. This one took really some time. There are over 50 pictures, each one of them photoshopped and described plus text. I was pretty exhausted when I was finished with this post. It took me actually several days of preparations. Blogging may be really tough sometimes. Limestone.

12. Most of my posts are read by people interested in geology, just like myself. This one, however, probably gathered much wider audience. It was Christmas card made of sand grains: Sand grain Christmas card.

If this is still not enough for you then you can take a look into the entire history of Sandatlas. Here are listed all the posts written so far: All posts.

Collage of sand

Sandatlas has recently drifted away from Sand. I’ve written mostly about rocks and I definitely have not finished with them. My page dedicated to types of rocks is nowhere near completeness. Rocks are fascinating but so is sand. There are several reasons why I have not written about sand for some time but I’ll leave that for now. The important thing is that I hope to write more sand-related posts in the future.

I made a collage of nine interesting sand samples and used it to illustrate the page of sand types and also wanted to make a separate post to show you how versatile and beautiful sand is.

http://picasaweb.google.com/107509377372007544953/Coll#5774351364580918770
1. Glass sand from Kauai, Hawaii
2. Dune sand from the Gobi Desert, Mongolia
3. Quartz sand with green glauconite from Estonia
4. Volcanic sand with reddish weathered basalt from Maui, Hawaii
5. Coral sand from Molokai, Hawaii
6. Coral pink sand dunes from Utah
7. Volcanic glass sand from California
8. Garnet sand from Emerald Creek, Idaho
9. Olivine sand from Papakolea, Hawaii