Spinel is both a mineral and a mineral group. As a mineral it has the following chemical composition: MgAl2O4. As a mineral group it shares the same structure but varies in chemical composition. Even magnetite (Fe2+Fe3+2O4) and chromite (Fe2+Cr2O4) belong to this group.
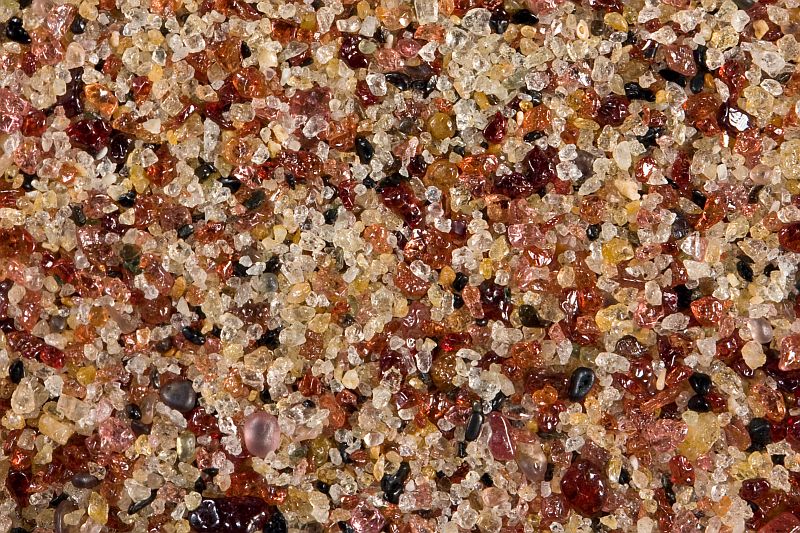
http://picasaweb.google.com/107509377372007544953/Rocks#5805071090057377074 Grains picked from a beach sand sample collected in Hambantota, Sri Lanka. The width of the view is 10 mm.
The group is divided into three series: spinel series (trivalent ion is aluminum), magnetite series (trivalent ion is iron), and chromite (trivalent ion is chromium) series.
Spinel series contains several end-member minerals of which spinel (sensu stricto) is the most common. Natural crystals are usually not pure endmembers. There are extensive replacements between different metal ions taking place which means that the minerals of the group are mostly solid solutions and that is the reason for such a variable color we encounter in the whole group, series, and the mineral itself.
The coloring agents of the series are Cr (red), Fe2+ (blue, green, black), Fe3+ (brown), Zn (bluish green), etc.
All minerals with spinel structure are optically isotropic and they have no cleavage. These are useful characteristics that help to identify the mineral. The mineral is often strongly colored. Red variety may be easily mistaken for garnet (both are isotropic as well) but spinel has usually deeper and darker red color. Grains in sand generally have matte surface with glossy patches.
http://picasaweb.google.com/107509377372007544953/Coll#5850350079283018242 Grains picked from a beach sand sample collected in Hambantota, Sri Lanka. Width of view 10 mm.
Spinel (sensu stricto) is mostly a metamorphic high-temperature mineral. It occurs in metamorphosed calcareous sediments (both regional and contact metamorphism) and argillaceous (rich in clay) high-temperature metasediments. It also occurs in igneous rocks and sometimes in hydrothermal veins too.
It is a physically hard mineral (harder than quartz) and is quite resistant to chemical weathering as well. Hence it is not uncommon in sand. Black minerals with matte surface and glossy patches are often spinel grains although their isotropism may be hard to determine because they are usually almost opaque. Tourmaline may be similar but is usually brownish, has often elongated and striated crystals, and has very strong pleochroism. It has no pleochroism and is always ‘extinct’ in crossed polarizers. You will need a polarizing microscope to test these properties (isotropism and pleochroism).
Heavy mineral sand from Sri Lanka which contains lots of intensely colored spinel grains. Width of view 20 mm.
There is only one question. I would like to know how many different minerals can you find in the image below? Can you name some? They are sand grains picked from a beach sand sample collected in Sri Lanka — the land of gems.
Answer
I know that photo only is usually not enough to identify a mineral. But in this case it should be possible. There is only one mineral. This mineral is well-known for its variable colors. Deep red, almost transparent, gray, blue, bluish green, brown, black. These are the colors that characterize this mineral which was mined in Sri Lanka many hundreds of years ago and continues to this day (by hand digging). No, it isn’t sapphire (corundum) which is the most important gemstone mined there. But this mineral is valued as a gemstone as well. It is spinel.
Cassiterite is a mineral composed of tin and oxygen (SnO2). It is the most important ore of tin. Pure cassiterite is light-colored mineral, but in real world it contains some iron, which makes the crystals often look almost opaque. The grains in sand are usually light to dark brown. Crystals are commonly twinned and it is a very helpful characteristic in mineral identification. Its twins are called elbow twins because two crystals are joined like the upper arm and forearm. Beautifully preserved specimens do not last in sand. Hence, we have not much hope finding perfect examples of twinned crystals. Take a look at the scheme below to find out how to spot elbow twins when studying sand grains.
http://picasaweb.google.com/107509377372007544953/Coll#5850314214880608370 This is how easily identifiable cassiterite sand grain may look like. Two crystals are joined like upper and forearm forming a characteristic notch (visor tin) between them (pointed by an arrow). There is no difference between the “upper arm” and “forearm”.
Cassiterite has strong luster which is usually described as adamantine or submetallic. Such luster is common to minerals with high refractive index. It is unusually heavy (density is ~7 grams per cubic centimeter) for an apparently nonmetallic mineral. There are several minerals that may look similar. Rutile (titanium oxide) for example may look alike, but it usually has deeper reddish color. Even garnet may sometimes look very similar to it.
http://picasaweb.google.com/107509377372007544953/Rocks#5805070887504369634 Cassiterite grains handpicked from a beach sand sample of La Turballe, France (The Bay of Biscay). How many elbow twins can you find? Width of view 7 mm.
http://picasaweb.google.com/107509377372007544953/Coll#5836225147912612562 Sand sample from La Turballe. Width of view 20 mm.
It is usually an igneous mineral crystallizing out of a felsic magma. Most tin ores are associated with granitic rocks which host cassiterite as an accessory mineral. It is a frequent component of hydrothermal veins and greisens also.
It is not abundant in rocks because tin is not among the commonest elements of the crust. But cassiterite is resistant to weathering and therefore pretty common (although rarely abundant) mineral in sand (stream tin).
Cornwall in England was once famous mining area, but there is no tin mining taking place anymore. Most important cassiterite sources are Malaysia, DR Congo, Indonesia, Bolivia, and Nigeria.
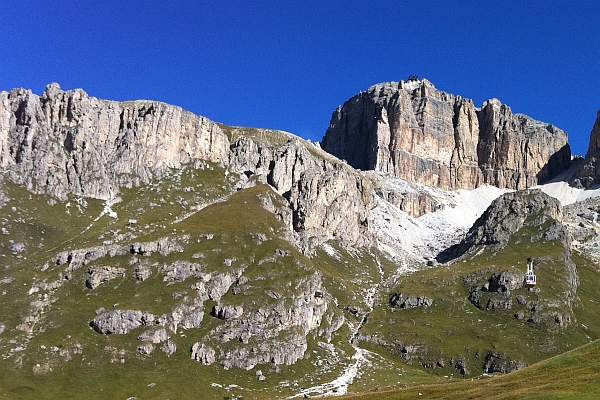
I thought that I do not have anything significant to add to Accretionary Wedge #41. My home country is very quiet geologically. Being far from the plate boundaries we rarely have anything dynamic happening here. I have experienced one earthquake but there is really not much to talk about. But then one event crossed my mind that happened several months ago while I was hiking in the Spanish Pyrenees. I have already shared a photo of a beautiful synclinal mountain I took the same day.
We were descending from a mountain pass while I heard a scared voice screaming my name maybe 20 meters up from where I was. I had no time to do anything. I just started to turn my head and the next moment got hit by a sizable cobble (maybe 15 cm in diameter). I was lucky to maintain my footing because otherwise everything could have ended very badly. It was not an edge of a cliff but more like a really steep slope down from where I was standing. Hence falling there doesn’t mean a certain death but the situation was still bad enough.
The cobble hit my ankle which was aching somewhat later but fortunately it caused no serious injury. Probably because my legs were protected by heavy hiking boots that softened the impact.
So with lots of exaggerations I could say that I am a survivor of a rock avalanche but let’s try to be reasonably modest. It was just one rock and the whole event is not worth much mentioning but if I really need to find some geological event that have most closely affected me, then I probably have to choose this one.
I never saw that rock again. It continued its jumping and rolling journey down the slope but I know it was conglomerate because the whole mountain is made of this rock type. Here are some pictures of this beauty.
I wish you all a happy new year with lots of interesting but preferably not too dangerous geology.
Dolomite is a common rock-forming mineral. It is the primary constituent of dolomite rock (dolostone) and dolomarble. It is similar to the most common carbonate mineral calcite. These two share some similarities in structure and are very closely related chemically. Calcite is chemically CaCO3 (calcium carbonate), dolomite is CaMg(CO3)2 (calcium-magnesium carbonate). It means that half of the calcium in the structure of calcite is replaced by the magnesium in dolomite. However, there is no solid solution between the two because calcium and magnesium ions have different size and hence can not replace each other directly in the crystal structure.
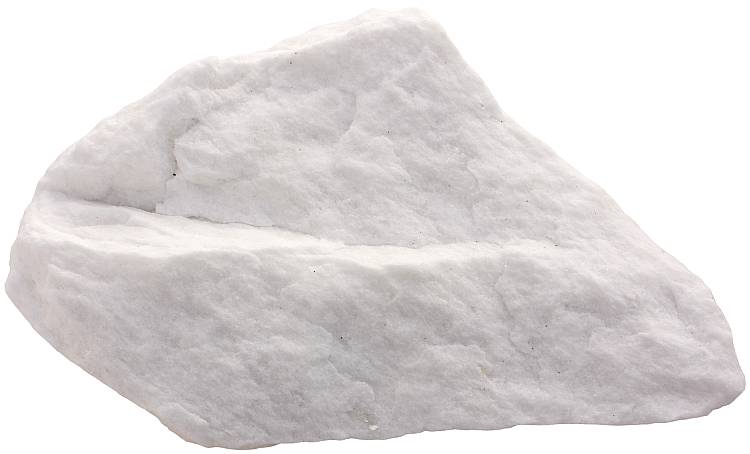
Dolomite may be the sole or primary constituent of marble. Dolomarble from Fauske, Norway. Width of sample 14 cm.
Dolostone is the most important rock type that is composed mostly of it. Dolostone was probably originally limestone which was altered by Mg-bearing water circulating in the rocks. Dolomite does not precipitate out of aqueous solutions like calcite does (in normal circumstances). Carbonate rock is dolostone if at least 50 percent of it is dolomite.
This rock type is very interesting because we still do not understand very well how it formed. Dolostone is also economically important rock type because it contains lots of pores (this is the result of dolomitization) and act therefore as an oil reservoir. Dolomite forms large part of some hydrothermal deposits where beautiful crystals may be found. It is also found in calcareous metamorphic rocks and sometimes even as a primary mineral in igneous rocks.
This mineral very often forms rhombohedral crystals. The same habit is characteristic to calcite as well, but calcite is more commonly anhedral. This is good to know because it is one of the most important characteristics that helps to identify the mineral. It is a carbonate mineral and hence reacts with dilute hydrochloric acid like calcite and aragonite. However, the reaction with cold acid is not nearly as vigorous. Small sand grain composed of calcium carbonate takes generally 30 seconds or more to dissolve in dilute HCl (10%). Dolomite needs 10 minutes or even more. However, this acid test may still sometimes yield false results. Another way to distinguish between the two is to use organic dye alizarin red S which turns calcite bright red, but does not affect dolomite.
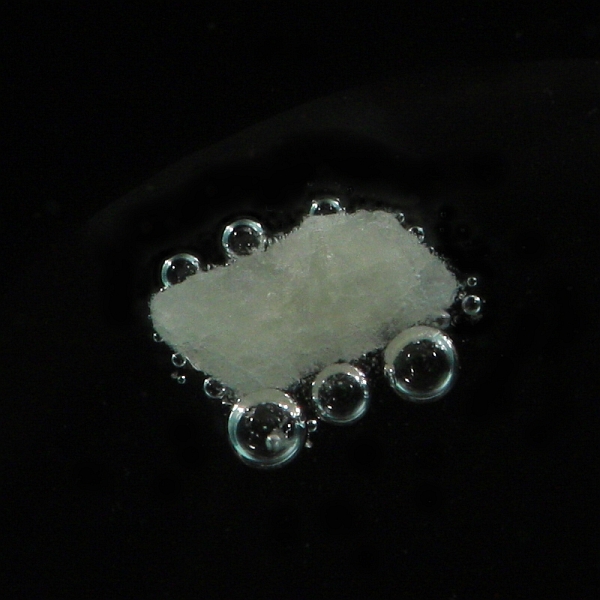
http://picasaweb.google.com/107509377372007544953/Rocks#5805070920815852402 Dolomitic sand grain with characteristic rhombohedral shape measuring approximately 1.5 mm. The same crystal, but here it is covered with acid. The bubbles contain carbon dioxide that escaped when the crystal structure broke up.
Using hydrochloric acid may not be a foolproof method to differentiate between dolomite and calcite, but it is tremendously useful in field studies to quickly determine whether the cement of clastic rocks is carbonate or not and it is also very useful in the study of sand samples. I often pick yellowish grains out of sand if I am not sure whether it is a badly worn out biogenic grain or feldspar for example. I just need to put one grain into a drop of acid on a glass slide and the answer is right there.
How common is it in sand? Not really common. It is a common cementing mineral in sandstone, but dolom. as a sand grain will not last very long. Dolomitic sand grains may form important part of some lithic sands which are the disintegration products of carbonate rocks nearby. The grain in the picture above is from Namibia. It is part of a very interesting blue colored sand composed mostly of sodalite.
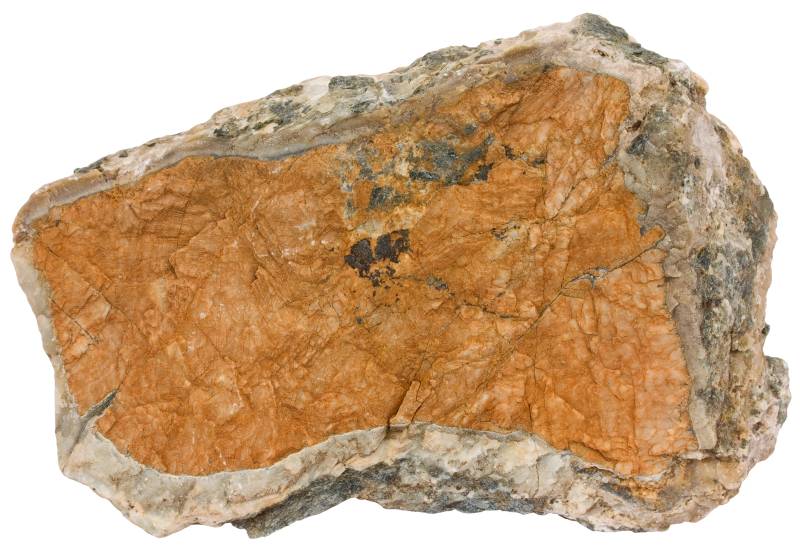
Dolomite in anorthositic granulite host rock. Bergen, Norway. Width of sample 13 cm. This mountain range in Northern Italy is largely composed of dolomite rock and is appropriately called the Dolomites.
Jessica Ball wrote about her experience at AGU where she talked about the Geoblogosphere. She also pointed to an article written by Callan Bentley et al. which I found very interesting. My blog was not included in this study because I wasn’t an active blogger then but I thought that maybe some of my readers find it interesting what I have learned during the past few months of active geoblogging.
For some reason I like to express myself in a written format. I have written more than 1,000 articles to Estonian Wikipedia. These articles are mostly about geology. Now I really don’t know why didn’t I start a blog instead. Wikipedia has strict guidelines, you do not work for yourself, you get almost no feedback, and there are often conflicts with other contributors and trolls. Maybe I just couldn’t believe that someone would ever follow my blog. That probably is still true because then I wrote in Estonian and just didn’t realize that I could possibly do it in English. There are only one million people in the world understanding Estonian. You won’t find too many among them who would like to read a geoblog.
I was concerned that I can’t find followers with my poor English skills but it seems now that it is not a problem. Maybe because native English speakers are so used to read faulty or awkward English written by non-native speakers that they do not even notice anymore.
But on the other hand I feel that my writing skills have improved considerably during that short timeframe. It is somewhat astonishing because all I did for that was writing this blog. So it is the first benefit that I have received from it. I am used to read texts in English. Now I also have a way of practicing writing. There is no doubt that it could be very beneficial in the future.
Another benefit is that it is a great motivator. There are many things in my to-do list but I am sometimes lazy. I would not do some of it because there is no urgent need. But writing a blog and trying to keep updating regularly with more or less meaningful posts is a challenge. You always run the risk that you have nothing to write about anymore. So I need to keep working with new material and ideas. It is rewarding because I learn new things all the time.
I do keep a general record of how many people visit my blog but I do not feel comfortable posting a statistical overview here. Maybe because the numbers are still very modest. However, the trend in encouraging and greatly exceeds my expectations. That too is motivating to see the number of visitors grow almost every week. I will try to do my best to see the numbers going up in the future as well.
There are many more potential benefits. I hope that I am not even aware of some of them yet. Is there anything bad also? It simply can not be that blogging is entirely positive experience. Yes, there is one annoying aspect. It is time that always seems to be in short supply but I shouldn’t complain about that. Everyone seems to have the same problem. Time actually is not the problem – we all have 24 hours a day. The problem is that there is too much that we would like to do. Blogging is just one thing that takes large chunks out of our days. But I do not see it as a big problem until it helps me to improve in many ways and until it is a fun thing to do.
As a conclusion I would definitely encourage you to start blogging if you are not doing it yet. It has been rewarding for me and would most likely not hurt you as well.
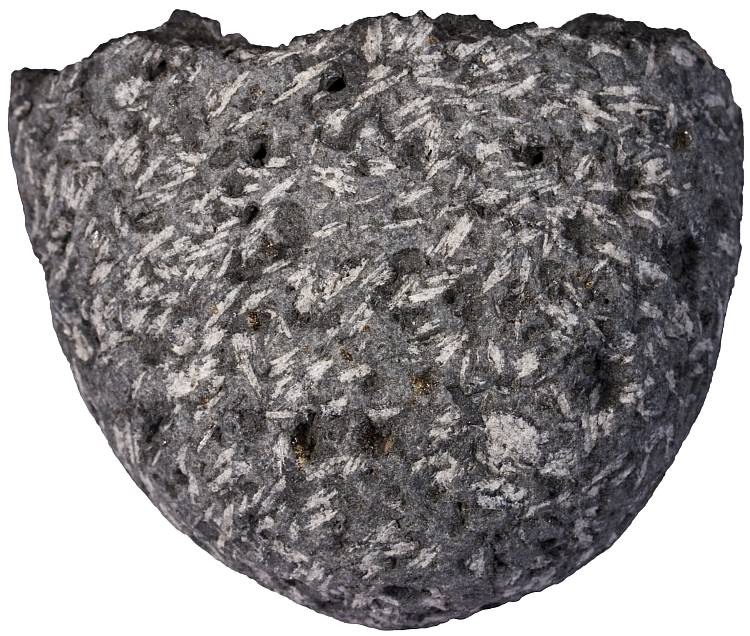
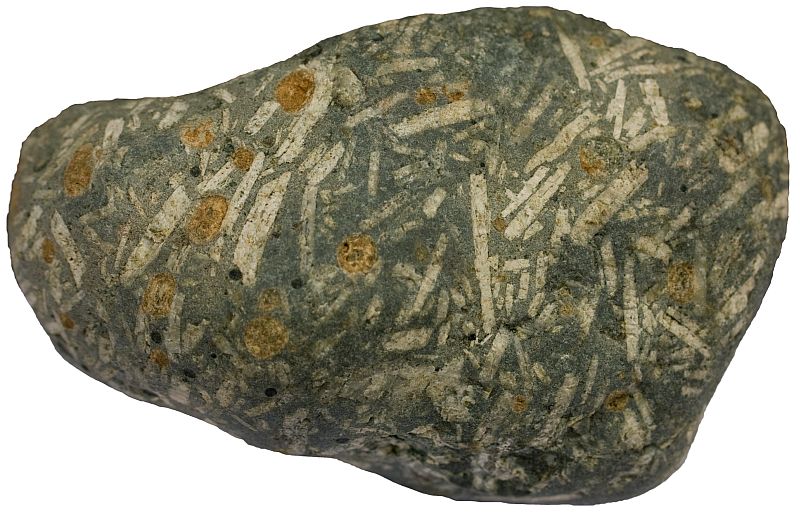
Diabase (dolerite) is a dark-colored igneous rock. It is compositionally equivalent to gabbro and basalt but texturally between them. Diabase is a common rock type. It occurs mostly in shallow intrusions (dikes and sills) of basaltic composition. It grades to basalt when it solidifies rapidly and to gabbro when more time is given to the crystals to grow. The term “microgabbro” is sometimes used to refer to such rocks.
Diabase with notable plagioclase phenocrysts from La Palma, Canary Islands. Width of sample is 5 cm.
Diabase is composed of plagioclase feldspar (mostly labradorite) and pyroxene (augite). The crystals that make up dolerite are usually visible to the naked eye, but sometimes porphyritic rocks of basaltic composition with pyroxene and especially plagioclase phenocrysts are also named that way. Ophitic texture (randomly oriented plagioclase laths enclosed by pyroxene grains) is a characteristic feature of diabase. Minerals of lesser importance are magnetite, olivine, ilmenite, hornblende, biotite, chlorite, etc.
The term “diabase” has a long and complicated history. It was first defined by a French geologist Alexandre Brongniart in 1807. Brongniart named so rocks that were composed of feldspar and hornblende. Another famous French geologist René Just Haüy preferred to use the term “diorite” for such a mineral assemblage and this concurs with the contemporary use. It was Brongniart himself who decided to abandon the term in 1827. However, it somehow managed to survive, mostly thanks to German scholars who continued to use it but now to refer to the rocks which were composed of pyroxene and plagioclase.
It was a German geologist Harry Rosenbusch in 1877 who decided to introduce the age criterion and possibly created a problem that persists to this day. According to him, only rocks of pre-Tertiary (pre-Cenozoic) age were named diabase. In Great Britain the term “dolerite” was used (although it too originates from France, this term was first used by Haüy in 1822) which has a meaning of a fresh-looking diabase and the term “diabase” itself was left to altered and old dolerites only. The age criterion is not in use anymore, but both “dolerite” and “diabase” continue to be used. These two terms are synonymous.
Diabase is a popular ornamental stone. Crushed stone is often made of it and it seems to be a popular choice to use in sauna heaters.
http://picasaweb.google.com/107509377372007544953/Rocks#5787194233322780322 Diabase is a popular ornamental stone. This sample of dolerite is from a tombstone workshop. Unknown locality. The width of the view is 25 cm.
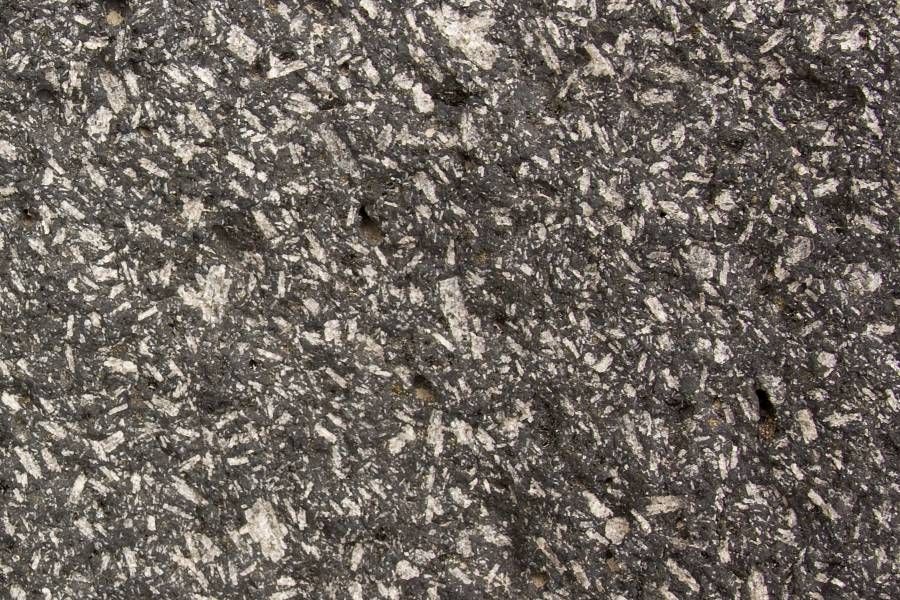
Mushroom Rock in Death Valley is carved from dolerite. Width of the view is about 25 cm.White phenocrysts are plagioclase and black phenocrysts are pyroxene crystals. Tenerife, Canary Islands. The width of the view is 14 cm.
http://picasaweb.google.com/107509377372007544953/Rocks#5787194278199935586 Dolerite from Portrush, Northern Ireland. The width of the view is 9 cm.
http://picasaweb.google.com/107509377372007544953/Rocks#5787194299559325458 Diabase (microgabbro) from Estonia. This sample is taken from a drillcore. The width of the view is 4 cm.
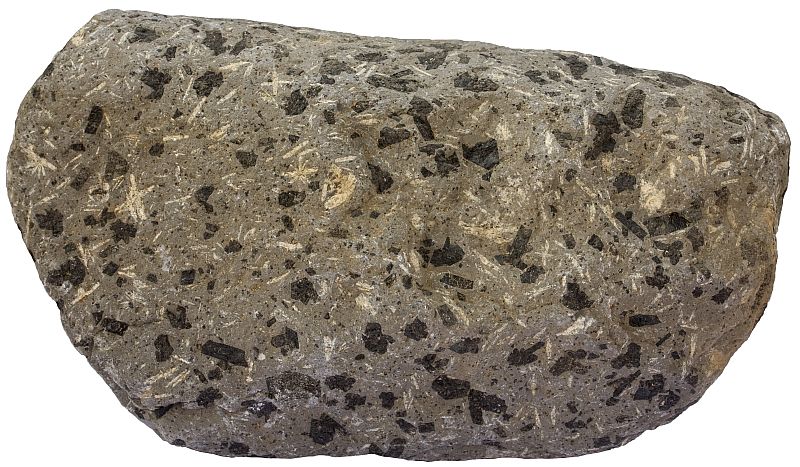
Porphyritic mafic volcanic rock with large plagioclase phenocrysts. Brown spots are left by sea animals that were attached to the rock. The Isle of Mull, Scotland. The rock is 8 cm in length.
http://picasaweb.google.com/107509377372007544953/Rocks#5787194326462518530 A piece of a dolerite dike of the Troodos sheeted dike complex in Cyprus.
http://picasaweb.google.com/107509377372007544953/Rocks#5787194349045543586 Sheeted dikes in Cyprus are composed of dolerite.
A contact between basalt (on the left) and dolerite in Cyprus. The basaltic dike is fine-grained because it is younger and was chilled (it lost heat rapidly to the diabase dike on the right).
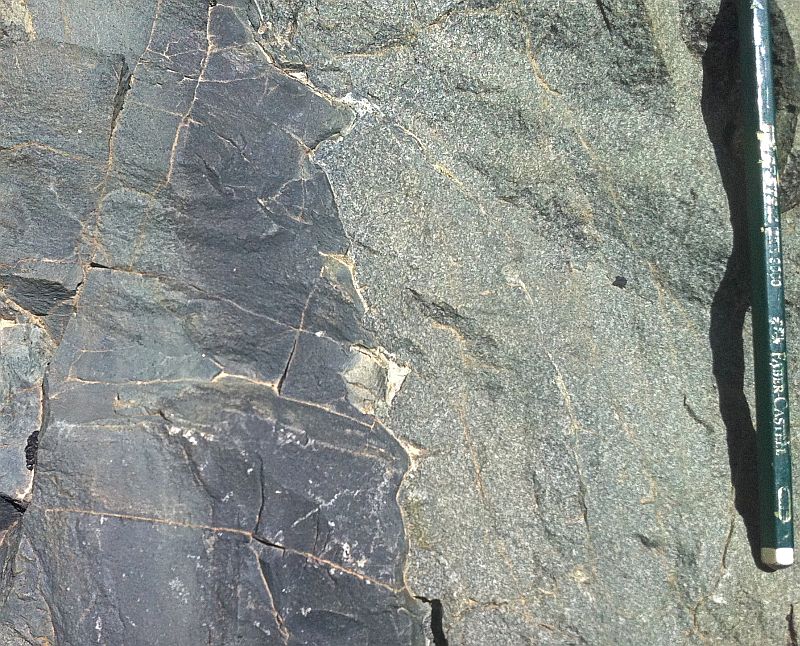
This Jurassic (probably) sandstone formation is cut by numerous clefts that form an interconnected network of passageways. It is easy to get lost in this labyrinth of moss covered sandstone walls.
The sandstone is fine- to medium-grained, weakly cemented, and yellow in color.
I recommend to visit this place if you happen to go to Luxembourg and have some free time. The capital of this small country is very scenic as well but these rocks were definitely the most interesting thing I saw there.
The sandstone disintegrated into fine sand. The width of the view is 10 mm.
There are several things you need to pay attention to if you wish to take good macro photos. Here are some tips I have acquired while learning this craft. Please note that I take macro photos of geological materials, mostly sand samples and rocks. Some of the advice given below may not be directly applicable or needed in other and more popular areas of macro photography.
Manual camera
Point-and-shoot cameras are not suitable for this job if you want really good results. You need to be able to manually set aperture, shutter speed, ISO, and white balance. I use Canon EOS 450D (Rebel XSi). The examples given below may not work directly with other models.
http://picasaweb.google.com/107509377372007544953/Coll#5852307320112952114 Good macro photo of a sand sample is in focus both horizontally (in every corner of the photo) and vertically (has adequate depth of focus). The colors are natural and the amount of light is just right – neither too bright nor too dark. I am not saying that this is a perfect photo but this is something I try to achieve and am satisfied with for now.
Macro lens
Really small objects like sand grains need macro lens. Only coarse sand can be successfully photographed with usual zoom lenses. I currently use Tamron 60 mm F/2 1:1 and Canon MP-E 65mm 1-5x macro lenses. If you will buy your macro lens, pay attention that it has at least 1:1 magnification. Anything less than that, 1:1.5 for example, is not real macro although salesmen sometimes call them that way.
What does this 1:1 mean? It means that at maximum magnification (1:1) you can take photos of objects measuring the size of your camera sensor. If the width of the sensor is 22 mm, then it is also the width of the object that will be photographed. Longer sides of my photos have 4272 pixels, so it means that there are 4272/22 = 194 pixels per one millimeter. This is good enough if you aim to photograph sand grains measuring 1 mm.
However, smallest sand grains by definition are only 63 micrometers in diameter. There will be only 12 pixels for every grain. That is definitely not enough if you want to use that sample as an identification guide of different minerals. To overcome that problem you need extreme macro lens like Canon MP-E 65mm 1-5× Macro. Yes, that allows to take photos of objects measuring only one fifth of the sensor.
Such magnification is comparable to most stereo microscopes. This macro lens is not cheap but it is still significantly more affordable than good microscope cameras. Here I use an opportunity to really warn you about the cheap microscope USB-cameras. This is garbage! You will only lose money while investing into this. I have tested several of these things.
If you want to take good images of really small objects then you have an option to choose between very expensive quality microscope cameras and significantly cheaper macro lenses for your camera. I recommend to go with the latter as it allows more flexibility and control which ultimately results in brighter and sharper images. The only downside, which I admit is annoying, is that you can not take images as soon as you see something interesting while examining your samples microscopically. But you never get good results without working hard, do you?
Sand sample photographed with stereo microscope and USB-camera. This camera is expensive and takes adequate images of thin sections. Yet, the picture of sand is too dark and lacks contrast. Doesn't seem to be appealing to me and would not make a good teaching material of mineral identification.
RAW
I strongly recommend to save your images in RAW format (possible with DSLR cameras). It allows you much more flexibility in photo processing. You can easily set white balance, correct wrong exposure, contrast, etc. This is the most important reason to use DSLR in my opinion. There are certainly other aspects too like ability to change lenses but many point-and-shoot cameras can take pictures of decent quality. Ability to save RAW sets SLR cameras apart from them. You really won’t use your camera’s potential if you are not shooting in RAW. However, RAW files are only good if you are willing to do post-processing. If not, then it will not benefit you. You need a software to view and edit RAW files. I use Camera Raw for that purpose. After you have converted your RAW files to images, I recommend to save them in TIFF format because JPG files lose quality every time you modify them and resave.
Tripod
You can not make good macro photos while holding a camera in your hands. You need a solid tripod. If you plan to use it indoors, then it would be a good idea to invest some more and get a really good one. I have to admit that mine is not as heavy as I’d like it to be and the legs of the tripod are frustratingly near to the object I am photographing.
I take mostly sand photos, so the object has to be placed horizontally while camera is directly above it. Why is it bad that the legs of the tripod are near? Because you want to set lamps all around the sample to get good lighting. These legs are just an obstacle that take the free room you’ll need for the lamps.
Remote release
You have to avoid shaking the camera while releasing the shutter. So you better do not touch the camera. Release the shutter remotely either from the computer your camera is connected to or with a remote control device.
Solid base
That should be obvious but I did that mistake earlier. Solid tripod will not help you if your sample is not standing still. Make sure that you place it on top of something heavy and firm.
Mirror lock
You may have a solid tripod, your sample is not vibrating and you do use remote release. Yet, your images are still not sharp. What is the problem? It may be the mirror inside your camera that is moving away from the light path just before the image is taken. When it moves, or more precisely when it stops moving, it shakes the camera a little and makes your picture less sharp than it ought to be. What to do about it? This mirror can be locked. It means that it will be removed from the light path when you press the remote release button which is several seconds before the photo is taken. Most of the slight wobble caused by the mirror will subside during that time. How to lock it? It depends on your camera. I have to choose Menu – Custom Functions – Enable Mirror lockup. You have to use your camera in manual mode (P, Tv, Av, M, or A-DEP) to access this part of your menu.
Connection with a computer
Your camera should be connected with your computer while you take images. You simply can not decide whether the photo is good enough or not when viewing it in the camera LCD screen. Let the software you got with your SLR directly download the images right after you take them and examine them carefully in full view to decide whether something needs to be changed. It may be lighting, aperture, sharpness, etc.
Manual mode
You should take the photos in full manual mode (M in Canon SLR). Do not let the camera decide the parameters. They are not very good at it. There are several things that you want to have full control of. I will cover them below.
Whether you want to have a manual focus depends. Some macro lenses do this job quite well with almost flat surfaces as sand grains, especially if you intend to use your photos in the web and will resize them later. However, if you want the best possible results, I recommend to focus manually. You need to magnify the image on the LCD screen (5-10 times) to be able to achieve the best possible results. If your object is more three-dimensional, you need to do it manually anyway because only you know which parts of the object need to be the sharpest. Some macro lenses have only manual focus. I do not recommend to watch your objects through the viewfinder. The view is often dim if you take macro photos which means that you have to seriously strain your eyes to make sure that your photos are in focus. Do not ruin your eyesight, it is not worth it. Use LCD screen and magnification to see fine details.
Object should be as flat as possible
Sure, you can make macrophotos of three dimensional real life objects but it comes at an expense of sharpness. There are many tradeoffs in photography just as everywhere else. More magnification means shallower depth of focus. If you need to use high magnification then you need to make sure that the object you are photographing is as planar as possible. I pour the sand I am photographing into the lid of a small and shallow micromount box and gently press the surface flat.
Of course, the object (sand surface) should be aligned as parallel as possible to the camera lens. Otherwise our photos will be sharp in one part of the photo only.
UPDATE: There is another and in many cases the only possible way if you want to take a sharp picture of a three-dimensional object. You should take multiple photos with different focal plane and later merge them into one sharp image with a special focus stacking software.
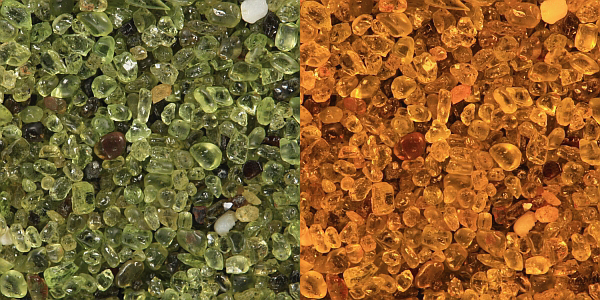
White balance
A gray card is used to correct the colors of photos.
Our cameras do not know what are the lighting conditions we use. The colors that will be recorded by the camera depend heavily whether we use direct sunlight, incandescent bulbs, fluorescent lights, etc. We have to make clear that our camera understands that correctly. There are several ways to accomplish that. I am covering here only the method that I use. This is very convenient method which I highly recommend.
I use a gray card. This card has specific neutral gray color with specific surface reflectability. Your camera already knows exactly how this card should look like because it is a strictly defined standard used in photography. If you take a photo of a gray card in the lighting conditions you are going to use subsequently and tell your camera that this is a gray card, then it automatically corrects the colors of the photos you will take from now on.
How to make it clear to your camera that you just made a photo of your gray card? There are „Custom WB“ in the menu of your camera. Choose it and then select the photo you just did of your gray card. Do not forget to set your camera to use Custom white balance after that. While you take the photo of a gray card, make sure that there is nothing else than the card in your picture.
If you purchase the card, make sure that it is entirely gray. There are color charts (with many colorful squares) as well but you will not need it to balance the colors.
These are mostly olivine grains. They are bright green when fresh and this color is adequately recorded in the first picture because I set the white balance by using a gray card. Something really awful seem to have taken place with the photo on the right. There are actually no more changes than white balance settings. I made it clear to the camera that I took this picture outside in the shade (color temperature 7000 K). In reality I used fluorescent bulbs (ca 4000 K). The result is that the camera falsely and greatly overcompensates by adding red color to the image. This example may be exaggerated but the concept of color temperature is of paramount importance. It must be addressed one way or another. Otherwise you are guaranteed to have ugly colors not reflecting the reality.
Lighting
You are going to need lots of light. I recommend to use several lamps (at least three) with powerful bulbs that cast light on the sample from different directions. These lamps should be near the sample but not too close. 10 cm works fine for me. Don’t worry that your sample may become too bright. It most likely won’t and you will regulate the amount of lighting later when setting shutter speed and aperture. You can use shorter shutter speed when you have lots of light which results in sharper images.
Bulbs should cast light on the sample from low angle. That is needed to amplify the 3D effect. It seems to me that if the lights are almost above the sample, the photo will be flat and boring and looks much more unprofessional.
Aperture
An aperture is an opening through which light enters your camera. It is set as an F-value. Macro lens I use allows me to choose an aperture between F2.0 and F22. Note that the smaller number means that the aperture is wider and larger number means it gets real narrow. Why do we need to set it? Because that’s the way to regulate the depth of focus and this is really important concept which should not be neglected. Smaller aperture (bigger number) means that we get better depth of focus which is needed to make sure that everything we want to show is in reasonably sharp focus. However, there is a tradeoff as well. Setting aperture smaller (increasing the value) means that our pictures start losing sharpness. That is another reason why we want the sand surface to be as flat as possible. My experience shows that F-values somewhere around 10 give me adequate depth of focus for sand photography while maintaining good sharpness. If you don’t want or can not make the surface reasonably flat (when photographing rocks for example) go for higher F-values. The slight loss of overall sharpness is not as noticeable as is the loss of sharpness in specific parts of your image.
Photo on the left has good depth of focus (F22) while photo on the right has only few grains in sharp focus (F2.0). This is why we need to use smaller aperture (larger F-values). However, it comes with a cost. The image on the left had an exposure time of 300 milliseconds while image on the right needed only 4 milliseconds. That should explain why good tripod is a must.
ISO
You want to take your photos with small ISO values (100 or 200). If you leave it to your camera to decide, it may choose ISO value 800 for example if it thinks that you do not have adequate lighting. Higher ISO values are used to make pictures in dimmer light. The tradeoff here is that your images become slightly more noisy. I recommend you make sure that you do have adequate lighting and then just force the camera to use ISO 100. However, this is probably one of the least important aspects discussed in this article. If you change ISO, you also have to adjust the shutter speed. Lowering ISO means you need longer exposure time. If you have to take the image while holding the camera in your hands, always try to find ways to make the shutter speed as short as possible. One good way to do it is to use higher ISO.
Shutter speed
Shutter speed is an exposure time. There is no fixed recommended value. It depends among other things on the values of ISO speed, aperture, and lighting. This is something that needs to be set separately for every photo you take. Take a photo and then decide whether you want it to be lighter or darker and accordingly adjust the shutter speed. Shutter speed 1/10 means that your cameras sensor will catch light only one tenth of a second. During that time your camera and the object you are photographing should be as still as possible. Chances for that are better if you use shorter shutter speed. However, you must use what you need. That’s why we have to make sure that our tripod and other methods that were discussed earlier guarantee that nothing moves even if it takes several seconds to take the image. Darker sand grains need longer time. Light-colored samples are therefore usually easier to work with.
Herkimer diamonds are double terminated quartz crystals found in cavities of dolostone host rock in New York State, USA.
Herkimer diamonds are pretty famous. You will find lots of websites talking about these beautiful crystals. Many of these sites are about astrology and New Age but there is usuful stuff too.
The fact that these crystals are actually not diamonds doesn’t make them any less interesting. What makes these crystals so unique? It is the fact that they have nearly perfect crystal faces on every side. This is really remarkable. Quartz crystals grown in cavities are not that rare but they are attached to the wall of the cavity on one end. So they have only one end with perfect crystal faces. Herkimer diamonds had to grow so that they had minimal contact with the host rock. I really don’t know why and how they managed to do that but it should be obvious that crystals grown that way must be exceedingly rare. The extreme clarity of the crystals makes them very appealing as well.
The host rock of the crystals is approximately 500 million year old dolostone. This does not mean that the quartz crystals found inside the rock are that old. They are definitely younger. First there was lime mud on the bottom of the shallow sea. This mud was buried and compacted until it became hard rock which we know as limestone. This limestone had its composition altered by the magnesium bearing fluids which slowly turned it into dolostone. Dissolution vugs or cracks had to form somehow and only then quartz crystals had a chance to start growing very slowly out of the silica bearing water that was moving through the rock formation.
You may also want to take a look at the article about the Pecos diamonds which are also double terminated quartz crystals but they grew in gypsum deposit.
http://picasaweb.google.com/107509377372007544953/Rocks#5805071014597717554 These Herkimer diamonds (double terminated quartz crystals) were collected 40 years ago. The width of the view is approximately 10 mm.
I thank Bill Beiriger for sending me these beautiful crystals.