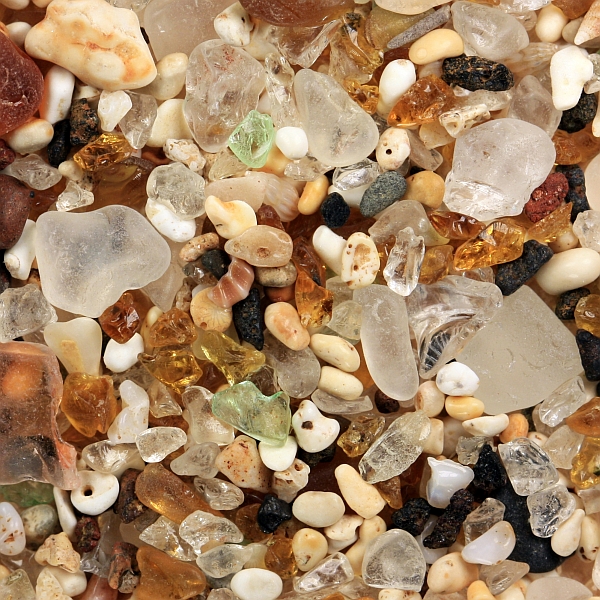
There are several things you need to pay attention to if you wish to take good macro photos. Here are some tips I have acquired while learning this craft. Please note that I take macro photos of geological materials, mostly sand samples and rocks. Some of the advice given below may not be directly applicable or needed in other and more popular areas of macro photography.
Manual camera
Point-and-shoot cameras are not suitable for this job if you want really good results. You need to be able to manually set aperture, shutter speed, ISO, and white balance. I use Canon EOS 450D (Rebel XSi). The examples given below may not work directly with other models.
Good macro photo of a sand sample is in focus both horizontally (in every corner of the photo) and vertically (has adequate depth of focus). The colors are natural and the amount of light is just right – neither too bright nor too dark. I am not saying that this is a perfect photo but this is something I try to achieve and am satisfied with for now.
Macro lens
Really small objects like sand grains need macro lens. Only coarse sand can be successfully photographed with usual zoom lenses. I currently use Tamron 60 mm F/2 1:1 and Canon MP-E 65mm 1-5x macro lenses. If you will buy your macro lens, pay attention that it has at least 1:1 magnification. Anything less than that, 1:1.5 for example, is not real macro although salesmen sometimes call them that way.
What does this 1:1 mean? It means that at maximum magnification (1:1) you can take photos of objects measuring the size of your camera sensor. If the width of the sensor is 22 mm, then it is also the width of the object that will be photographed. Longer sides of my photos have 4272 pixels, so it means that there are 4272/22 = 194 pixels per one millimeter. This is good enough if you aim to photograph sand grains measuring 1 mm.
However, smallest sand grains by definition are only 63 micrometers in diameter. There will be only 12 pixels for every grain. That is definitely not enough if you want to use that sample as an identification guide of different minerals. To overcome that problem you need extreme macro lens like Canon MP-E 65mm 1-5× Macro. Yes, that allows to take photos of objects measuring only one fifth of the sensor.
Such magnification is comparable to most stereo microscopes. This macro lens is not cheap but it is still significantly more affordable than good microscope cameras. Here I use an opportunity to really warn you about the cheap microscope USB-cameras. This is garbage! You will only lose money while investing into this. I have tested several of these things.
If you want to take good images of really small objects then you have an option to choose between very expensive quality microscope cameras and significantly cheaper macro lenses for your camera. I recommend to go with the latter as it allows more flexibility and control which ultimately results in brighter and sharper images. The only downside, which I admit is annoying, is that you can not take images as soon as you see something interesting while examining your samples microscopically. But you never get good results without working hard, do you?

Sand sample photographed with stereo microscope and USB-camera. This camera is expensive and takes adequate images of thin sections. Yet, the picture of sand is too dark and lacks contrast. Doesn't seem to be appealing to me and would not make a good teaching material of mineral identification.
RAW
I strongly recommend to save your images in RAW format (possible with DSLR cameras). It allows you much more flexibility in photo processing. You can easily set white balance, correct wrong exposure, contrast, etc. This is the most important reason to use DSLR in my opinion. There are certainly other aspects too like ability to change lenses but many point-and-shoot cameras can take pictures of decent quality. Ability to save RAW sets SLR cameras apart from them. You really won’t use your camera’s potential if you are not shooting in RAW. However, RAW files are only good if you are willing to do post-processing. If not, then it will not benefit you. You need a software to view and edit RAW files. I use Camera Raw for that purpose. After you have converted your RAW files to images, I recommend to save them in TIFF format because JPG files lose quality every time you modify them and resave.
Tripod
You can not make good macro photos while holding a camera in your hands. You need a solid tripod. If you plan to use it indoors, then it would be a good idea to invest some more and get a really good one. I have to admit that mine is not as heavy as I’d like it to be and the legs of the tripod are frustratingly near to the object I am photographing.
I take mostly sand photos, so the object has to be placed horizontally while camera is directly above it. Why is it bad that the legs of the tripod are near? Because you want to set lamps all around the sample to get good lighting. These legs are just an obstacle that take the free room you’ll need for the lamps.
Remote release
You have to avoid shaking the camera while releasing the shutter. So you better do not touch the camera. Release the shutter remotely either from the computer your camera is connected to or with a remote control device.
Solid base
That should be obvious but I did that mistake earlier. Solid tripod will not help you if your sample is not standing still. Make sure that you place it on top of something heavy and firm.
Mirror lock
You may have a solid tripod, your sample is not vibrating and you do use remote release. Yet, your images are still not sharp. What is the problem? It may be the mirror inside your camera that is moving away from the light path just before the image is taken. When it moves, or more precisely when it stops moving, it shakes the camera a little and makes your picture less sharp than it ought to be. What to do about it? This mirror can be locked. It means that it will be removed from the light path when you press the remote release button which is several seconds before the photo is taken. Most of the slight wobble caused by the mirror will subside during that time. How to lock it? It depends on your camera. I have to choose Menu – Custom Functions – Enable Mirror lockup. You have to use your camera in manual mode (P, Tv, Av, M, or A-DEP) to access this part of your menu.
Connection with a computer
Your camera should be connected with your computer while you take images. You simply can not decide whether the photo is good enough or not when viewing it in the camera LCD screen. Let the software you got with your SLR directly download the images right after you take them and examine them carefully in full view to decide whether something needs to be changed. It may be lighting, aperture, sharpness, etc.
Manual mode
You should take the photos in full manual mode (M in Canon SLR). Do not let the camera decide the parameters. They are not very good at it. There are several things that you want to have full control of. I will cover them below.
Whether you want to have a manual focus depends. Some macro lenses do this job quite well with almost flat surfaces as sand grains, especially if you intend to use your photos in the web and will resize them later. However, if you want the best possible results, I recommend to focus manually. You need to magnify the image on the LCD screen (5-10 times) to be able to achieve the best possible results. If your object is more three-dimensional, you need to do it manually anyway because only you know which parts of the object need to be the sharpest. Some macro lenses have only manual focus. I do not recommend to watch your objects through the viewfinder. The view is often dim if you take macro photos which means that you have to seriously strain your eyes to make sure that your photos are in focus. Do not ruin your eyesight, it is not worth it. Use LCD screen and magnification to see fine details.
Object should be as flat as possible
Sure, you can make macrophotos of three dimensional real life objects but it comes at an expense of sharpness. There are many tradeoffs in photography just as everywhere else. More magnification means shallower depth of focus. If you need to use high magnification then you need to make sure that the object you are photographing is as planar as possible. I pour the sand I am photographing into the lid of a small and shallow micromount box and gently press the surface flat.
Of course, the object (sand surface) should be aligned as parallel as possible to the camera lens. Otherwise our photos will be sharp in one part of the photo only.
UPDATE: There is another and in many cases the only possible way if you want to take a sharp picture of a three-dimensional object. You should take multiple photos with different focal plane and later merge them into one sharp image with a special focus stacking software.
White balance

A gray card is used to correct the colors of photos.
Our cameras do not know what are the lighting conditions we use. The colors that will be recorded by the camera depend heavily whether we use direct sunlight, incandescent bulbs, fluorescent lights, etc. We have to make clear that our camera understands that correctly. There are several ways to accomplish that. I am covering here only the method that I use. This is very convenient method which I highly recommend.
I use a gray card. This card has specific neutral gray color with specific surface reflectability. Your camera already knows exactly how this card should look like because it is a strictly defined standard used in photography. If you take a photo of a gray card in the lighting conditions you are going to use subsequently and tell your camera that this is a gray card, then it automatically corrects the colors of the photos you will take from now on.
How to make it clear to your camera that you just made a photo of your gray card? There are „Custom WB“ in the menu of your camera. Choose it and then select the photo you just did of your gray card. Do not forget to set your camera to use Custom white balance after that. While you take the photo of a gray card, make sure that there is nothing else than the card in your picture.
If you purchase the card, make sure that it is entirely gray. There are color charts (with many colorful squares) as well but you will not need it to balance the colors.
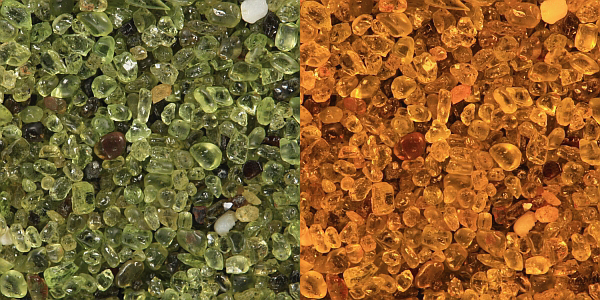
These are mostly olivine grains. They are bright green when fresh and this color is adequately recorded in the first picture because I set the white balance by using a gray card. Something really awful seem to have taken place with the photo on the right. There are actually no more changes than white balance settings. I made it clear to the camera that I took this picture outside in the shade (color temperature 7000 K). In reality I used fluorescent bulbs (ca 4000 K). The result is that the camera falsely and greatly overcompensates by adding red color to the image. This example may be exaggerated but the concept of color temperature is of paramount importance. It must be addressed one way or another. Otherwise you are guaranteed to have ugly colors not reflecting the reality.
Lighting
You are going to need lots of light. I recommend to use several lamps (at least three) with powerful bulbs that cast light on the sample from different directions. These lamps should be near the sample but not too close. 10 cm works fine for me. Don’t worry that your sample may become too bright. It most likely won’t and you will regulate the amount of lighting later when setting shutter speed and aperture. You can use shorter shutter speed when you have lots of light which results in sharper images.
Bulbs should cast light on the sample from low angle. That is needed to amplify the 3D effect. It seems to me that if the lights are almost above the sample, the photo will be flat and boring and looks much more unprofessional.
Aperture
An aperture is an opening through which light enters your camera. It is set as an F-value. Macro lens I use allows me to choose an aperture between F2.0 and F22. Note that the smaller number means that the aperture is wider and larger number means it gets real narrow. Why do we need to set it? Because that’s the way to regulate the depth of focus and this is really important concept which should not be neglected. Smaller aperture (bigger number) means that we get better depth of focus which is needed to make sure that everything we want to show is in reasonably sharp focus. However, there is a tradeoff as well. Setting aperture smaller (increasing the value) means that our pictures start losing sharpness. That is another reason why we want the sand surface to be as flat as possible. My experience shows that F-values somewhere around 10 give me adequate depth of focus for sand photography while maintaining good sharpness. If you don’t want or can not make the surface reasonably flat (when photographing rocks for example) go for higher F-values. The slight loss of overall sharpness is not as noticeable as is the loss of sharpness in specific parts of your image.

Photo on the left has good depth of focus (F22) while photo on the right has only few grains in sharp focus (F2.0). This is why we need to use smaller aperture (larger F-values). However, it comes with a cost. The image on the left had an exposure time of 300 milliseconds while image on the right needed only 4 milliseconds. That should explain why good tripod is a must.
ISO
You want to take your photos with small ISO values (100 or 200). If you leave it to your camera to decide, it may choose ISO value 800 for example if it thinks that you do not have adequate lighting. Higher ISO values are used to make pictures in dimmer light. The tradeoff here is that your images become slightly more noisy. I recommend you make sure that you do have adequate lighting and then just force the camera to use ISO 100. However, this is probably one of the least important aspects discussed in this article. If you change ISO, you also have to adjust the shutter speed. Lowering ISO means you need longer exposure time. If you have to take the image while holding the camera in your hands, always try to find ways to make the shutter speed as short as possible. One good way to do it is to use higher ISO.
Shutter speed
Shutter speed is an exposure time. There is no fixed recommended value. It depends among other things on the values of ISO speed, aperture, and lighting. This is something that needs to be set separately for every photo you take. Take a photo and then decide whether you want it to be lighter or darker and accordingly adjust the shutter speed. Shutter speed 1/10 means that your cameras sensor will catch light only one tenth of a second. During that time your camera and the object you are photographing should be as still as possible. Chances for that are better if you use shorter shutter speed. However, you must use what you need. That’s why we have to make sure that our tripod and other methods that were discussed earlier guarantee that nothing moves even if it takes several seconds to take the image. Darker sand grains need longer time. Light-colored samples are therefore usually easier to work with.
I have written more about macro photography. Here is a tutorial for isolating photos on white and How to quickly enhance your pictures.
Siim–This is really excellent! Thanks for posting such a detailed article. I’m always impressed with the lighting in your photos, and I’m curious about the type of lighting you use; do you just use regular incandescent lights? You say you use 3 lamps; are they more-or-less equal in intensity? Do you have them evenly spaced around the subject, or do you use one strong main light and two fill lights?
Thanks again,
–Howard
My fluorescent lamps are more or less evenly spaced. Incandescent lamps are not suitable because they emit enormous amount of heat. You risk burning yourself and damaging your equipment with these. I tried that at first but very quickly gave up. Lamps are equal in intensity. I should probably use some kind of diffusors to make the light softer. There is lots of room for experimentation.
Re depth of field: There’s a number of (free!) frame-stacking software out there that can assemble only the in-focus parts of a depth-varying sequence of photographs to yield one that’s in focus everywhere!
I’ve downloaded CombineZP..
(which I chose because it’s the one that I’ve heard about the most from my mineral photomicrography friends)
..but haven’t used it yet, since I’ve had to retreat to ~focusing~ on some of the other elements you mention.
Nice article, informative, I have since a few years a Panasonic 8mp camera it has in comparison with a 35mm. camera a zoomlens 28 to 280mm, with macro up to 5cm, for my holiday work perfect.
For at home, recently I acquired a Yashica 100mm medical macro, with an inbuild ringflash for my Contax 167, an oldfashioned analog camera, one that uses a film.
It is mounted on the stand of my first enlarger of almost 40 years ago, it has a base of 40x40cm. and 3cm. thick wood and it gives me from 0 to 40cm. distance between the film to the object, that is enough for any kind of enlarging/macro that I like.
At the moment I’m still in the proces of test shots to get a perfect setup.
The lens gives me up to 1:1 macro, and by using an analog film which gives me an almost unlimited enlarging posibilitys, when the original negative was 100%, I can enlarge a grain of clay to a postcard or bigger.
The ringflash gives a perfect spread of light over the total photo.
The only thing I dont like about this setup is, I have no instand control over the results and have to wait a few days to see it, but I do not have the means to replace my compleet macro equipment, lenses from 12.5mm to 100mm. bellows, extension rings, dedicatet flash, for macro, biside that, most of it is not there for the modern digital camera, and my old material has to be rebuild for a digital.
I’m a retired marine engineer and have used this equipment, exept the medical macro, for +/- 30 years now.
This should help. It’s hard to get good lighting on extreame close ups.http://www.instructables.com/id/Dead-Center-Camera-Lighting-For-Macro-Photography/
Thank you so much for your effort in writing this educative article.